Forms with ritmail
Form Parts: The Web Page and the Form Action Program
Forms have two parts.
1.) The form web page where users type in information and
2.) the script or program on the server that processes the collected information.
Dreamweaver can assist in creating the form web page.
Exercise: Create a comment form: See a sample at http://wally.rit.edu/general/feedback.html
1. Start Dreamweaver. Create a new Dreamweaver document by choosing File > New.
Click the cursor in the document window, where you would like the form to begin.
2. Choose Insert > Form. A red dotted box outline will appear.
Important: All of the form questions and buttons must be inside this the red dotted border
for the form to work.
3. Setting up Form and Form Action (Program that processes information) (Required)
3a. Click on the red dotted outline of the form to display the Property Inspector.
Note: Select Window > Properties if the property inspector does not appear.

3b. In the Properties Inspector for Form designate a unique name for the form
(i.e. Feedback) and a form action and method.
The action is: http://www.rit.edu/cgi-bin/ritmail.cgi
The method to select is POST
Note: The form action is the web address of the program that will process the submitted
information from your form and email it to you.
3c. Click back on the document window. If you need to make changes to these properties
click on the red dotted outline of the form and the form properties will
reappear. This will give you access to correct this setting if there are typos.
Note: The ritmail.cgi program is provided for RIT campus users to email form feedback to
themselves from the web. It is configured to work for web forms on any web server in
the rit.edu domain. The ritmail program originates from Matt's Script Archive. To learn
more about it: http://www.worldwidemart.com/scripts/formmail.shtml
4. Who should the form feedback be emailed to ? Insert a recipient hidden field: (Required)
4a. Click inside the form red dotted outline and choose
Insert > Form Objects > Hidden Field

4b. Type recipient for the name of the hiddenfield
4c. Type the Value in as your email address at RIT. This is where the feedback from
the form will be sent.
4d. Click back on the document window. A yellow tab will appear for the hidden field
recipient setting. Clicking this tab will give you access to correct this setting in case of typos.
5A-E. Creating form questions and answers with form objects.
(Required: Use one or more form objects for each Q&A.)
5. Click inside the red outlined box and type questions that users will answer. After
each question select the best form object for the response you expect. See 5A-5D.
Unique Naming of All Form Objects (Except Radio Buttons): Each form object in the
same form must have a unique name to avoid overwriting user responses. For
example, if two different form objects, a text box and a checkbox, are called
"email". The returned information will only be reported for the last "email"
form object filled in.
The only repetition of form object names occurs in a question using radio
buttons for responses. Each radio button in that question will be named
the same so that only one answer can be selected. (For example: reply
with a value of yes or reply with a value of no)
All Form Objects must be inside the dotted red border line of the form.
Do not collect private information off your form. This type of form is not
encrypted so student id numbers, credit card and even nonpublic
personal information is not a good idea to collect.
Answer Options:
A. Text Field: Use single line for fill in the blank answers or multi-line
for short paragraphs.
B. Check boxes: Use for questions where there is more than one
possible given answer, such as "choose all that apply".
C. Radio buttons: Use for questions where there is only one answer,
such as yes/no questions or multiple choice.
D: List/Menu: Use to choose from a set of short responses.
E. Buttons: Use to submit or clear the form information.
OR Image Field: Can be substituted for Submit if you wish to use
an image button for submit.
Inserting Questions and Answers: Type a question and then insert
the best type of answer response . (A-E described above.) All of
these options can be selected from the Insert > Form Objects menu
or from the Objects Form palette. (Window > Objects. Click Common
drop-down on the objects palette and pick Forms.)
5A. Text Fields: For open-ended questions.
5A1. Click inside the form outline and choose Insert > Form Objects >
Text Field to collect open-ended answer data. (realname, email,
subject, question.)
5A2. Type a unique name for the text field and choose options of
character length and maximum length if appropriate. Click single line
for short answers.

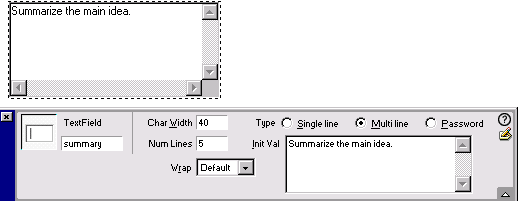
5A3. Multi line Text Fields: To collect longer open-ended information
check-off Multi line. Fill in the number of lines. Optionally, include the
initial value you would like to have appear.

5B. Insert checkboxes: For questions with more than one correct response.
5B1. Click inside the form outline and choose Insert > Form Objects >
Check Boxes for questions with more than one possible response. Use a
different name for every checkbox that describes the response. (i.e. faculty, student)

5B2. In the Properties Inspector, select the check box and give the check
box a unique name having to do with the response. (I.e. Faculty)

5B3. Type yes in the checked value. Mark the initial state as unchecked.
5C. Insert a radio button: For questions with only one correct response.
5C1.Click inside the form outline and choose Insert > Form Objects > Radio buttons.

5C2.In the Properties Inspector, give the radio button a name having to do
with the question. For each radio button that responds to this question use
the SAME name. Use the same unique name for every button that responds
to the same question.(I.e. reply)
5C3.Type in answer for the checked value. The checked value should be different.
(I.e. Yes or No)


5D. Insert a List or Menu: For a drop-down menu of answers.
5D1. Click inside the form outline, Choose Insert > Form Objects > List Menu
5D2.In the Properties Inspector (Window > Properties) choose Menu or List.
Give the List/Menu a unique name (select, vote, etc.)
Menu vs. List: A Menu is a drop down that shows all choices and lets the user select one.
A List shows all the items and allows the user to select one or more selections.


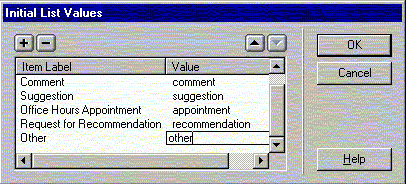
5D3. Click List Values button on the upper right of the list property inspector

5D4 Fill the Item Label names for each item as it should appear on the list or menu
Fill in a one word value on the right that reminds of which item on the list was
chosen. These are the categories that will be returned to you in e-mail to specify
the response to the question. Click the + to add more items. Use the up and down
arrows on the List values to change the order of the choices.
6E. Required: Insert a button to submit. The reset form button is optional. Image
button can also be used to submit a form.
6E1. Click inside the form outline, choose Insert > Form Objects > Button.
A Submit button will be put in depending on the action that is selected.
Name the button by its function (Submit or Reset). Label it by function
with whatever you like (Submit, Send, Email to Webmaster OR Reset,
Clear, Clear the Form, etc.)


7. Testing the Form: To fully test the form with ritmail.cgi, you must upload it to
grace.rit.edu. with the Site Editor. Go to the form with your web browser and
fill it in to test that all of your elements are working.
(http://www.rit.edu/~yourRITusername/yourform.html For example:
http://www.rit.edu/~abc1234/feedbackform.html)
You should get an email message from the ritmail program:
What you get back in mail:
Subject: test of my form
Date: Thu, 05 Oct 2000 12:09:11 -0400 (EDT)
From: abc1234@ritvax.isc.rit.edu ()
To: mlfwml@ritvax.isc.rit.edu
Below is the result of your online form. It was submitted by
(abc1234@rit.edu) on Thursday, October 5, 2000 at 12:09:11
---------------------------------------------------------------------------
name: Abby Clark
message: I am testing out my form
Submit: Submit
---------------------------------------------------------------------------
Other optional configuration with form objects.
Anywhere within the form red dotted outline you can add the
following objects to customize your form.
Object type Name Fill in Value Description
Text subject user types in appears as subject of email
Hidden subject you type in a subject word or phrase you specify
the subject of the emails from the form
Text email user types in appears in the From: line of email allowing direct reply
Text realname user types in appears in the From line of the email
Hidden redirect
web address of the redirect page you create.
web address of a page that is returned to the user after they fill in the form
http://www.rit.edu/~yourusername/redirectpage.html
http://www.rit.edu/~abc1234/thanks.html
Create a document called thanks.html
Hidden required
field names separated by commas
If value is set as subject, email, realname then those fields cannot
be left blank. (see missing_error report)
Hidden missing_fields_redirect web address
web address of a page that is returned to the user after they fail to
fill in the form required fields. Create a document called error.html
http://www.rit.edu/~yourusername/error.html
http://www.rit.edu/~abc1234/error.html
Hidden env_report any allowed environmental variables
Try values as follows to learn the host and IP of the server making
the request and the browser type used. REMOTE_HOST,
REMOTE_ADDR,HTTP_USER_AGENT
Hidden sort
alphabetic
order:name1,name2
Email will have fields organized in specified order
Hidden print_config comma separated names email,
realname, subject are in the email header. Designate them if you want them in the body too
Fields to use if you DO NOT use the hidden redirect tag
Object type Name Fill in Value Description
Hidden title Feedback Form title of reporting page if no redirect (after form is submit)
Hidden return_link_url web address the web address of reporting page
Hidden return_link_title text the clickable text to go to the return link
Hidden background web address of image location background pattern of the page
Hidden bgcolor Hexadecimal for the color of the page #FFFFFF for a white background color
Hidden text_color Hexadecimal for the color of the text #000000 for black text
Hidden link_color Hexadecimal for the color of the link #FF0000 for red link color
Hidden vlink_color Hexadecimal for the color of the visited links #0000FF for blue links
Hidden alink_color Hexadecimal for the color of the text #FF0000 for red link text |


